前言
欢迎页面的准备工作之前已经完成。接下来,我们将编写一个新闻页面,主要包括导航栏、轮播图和新闻列表。包括的技术主要包括使用 swiper 组件。为了方便代码的管理,把之前的代码同步到github上,新闻列表就是在此基础上写的。
准备好工作了
要将上次写的欢迎页面的代码同步到GitHub,主要步骤如下:
首先需要在GitHub中创建一个微信版本库(版本库可以任意命名),用户代码的版本管理;然后将版本库克隆到本地的微信文件夹(文件夹可以任意命名);欢迎页面的代码(需要同步的代码)移动到微信文件夹;终于同步确认了,在GitHub可以看到本地同步的代码,准备工作就完成了。
git的使用方法可以参考我的另一篇文章:Git版本管理
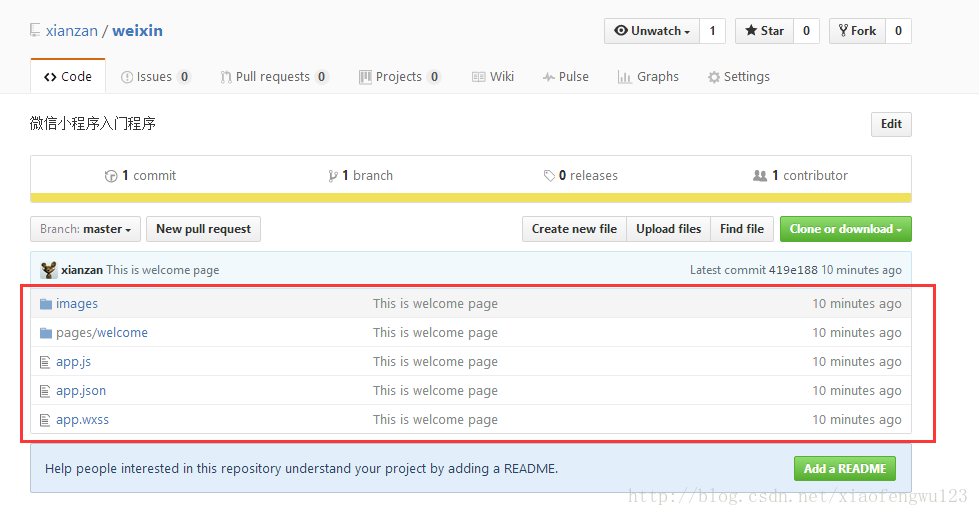
新闻列表的目录结构
与欢迎页面的目录结构类似,需要在微信小程序的IDE中创建相应的目录结构。

swiper组件的使用需要把app.json的第一启动页改成post.wxml微信小程序颜色,这样会方便调试
"pages": [
   "pages/post/post",
   "pages/welcome/welcome"
  ]
在微信小程序中,默认启动的第一个页面是在第一个位置,所以后面调试程序页面的人只需要将需要调试的程序页面放在第一个位置即可。直接保存后会报错,这里可能有bug
这里的错误报告很奇怪。解决方案是将 {} 添加到 post.json 页面。
2. 轮播创建
在官方文档中微信小程序颜色,组件被称为滑块视图容器,其中只能放置组件,而我们要旋转的组件需要放入其中才能生效。
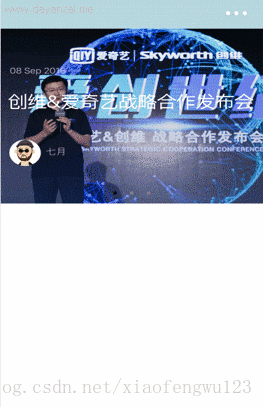
<swiper>
    <swiper-item><image src="../../images/tab/iqiyi.png">image>swiper-item>
    <swiper-item><image src="../../images/tab/vr.png">image>swiper-item>
    <swiper-item><image src="../../images/tab/wx.png">image>swiper-item>
swiper>
效果如下:

As can be seen from the renderings, it does not meet its own expectations, and it is necessary to set the rotation time and the size of the picture.
3. Set the swiper attribute and the style of the picture
<swiper indicator-dots="true" autoplay="true" interval="2000">indicator-dots=”true”Display panel indicator dots
autoplay=”true” is set to switch automatically
interval=”2000” The time interval for automatic switching is 2s
Here are the image size settings:
Adding a style to the test does not change the style of the carousel, as can be known from the official documentation:
Can only be placed in components, width and height are automatically set to 100%.
In other words, the width and height are inherited from the default width and height of the parent component, so to change the width and height of the image, you can start from the following two points:
code show as below:
<swiper indicator-dots="true" autoplay="true" interval="2000" style="width:100%;height:500rpx">
  <swiper-item style="width:100% ;height:500rpx">
    <image src="../../images/tab/iqiyi.png" style="width:100%;height:100%">image>
  swiper-item>
  <swiper-item>
    <image src="../../images/tab/vr.png" style="width:100%;height:100%">image>
  swiper-item>
  <swiper-item>
    <image src="../../images/tab/wx.png" style="width:100%;height:100%">image>
  swiper-item>
swiper>
效果如下:
最后为了让页面结构清晰,把页框代码和样式代码分开,把所有的样式代码放在post.wxss中
swiper{
    width:100%;
    height:500rpx
}
swiper swiper-item image{
    width:100%;
    height:100%
}
修改导航栏
由于新闻列表页面的导航栏与欢迎页面的导航栏不同,所以需要在 post.json 中配置导航栏,使新闻列表有不同的导航栏:
{
    "navigationBarBackgroundColor": "#405f80",
    "navigationBarTitleText":"新闻"
}
效果如下:
当app.json和post.json都配置了导航栏,最后显示了post.json配置的导航栏,由此可以得出一个结论:配置遵循就近原则。新闻列表
消息效果如下:
分析:从效果图来看,整个新闻可以分为三个部分:
最后将这三个部分放在一个最外层的元素中。
先写新闻的框架:
<view class="wrap">
  <view class="new-author-date">
    <image src="src" class="new-author">image>
    <text class="new-date">text>
  view>
  <view class="new-info">
    <text class="new-info-tile">text>
    <image src="src" class="new-info-img">image>
    <text class="new-info-summary">text>
  view>
  <view class="new-img-num">
    <image src="src" class="new-img">image>
    <text class="new-num">text>
    <image src="src" class="new-img">image>
    <text class="new-num">text>
  view>
view>
在 post.wxss 中写下样式:
.wrap {
  display: flex;
  flex-direction: column;
  margin-top: 10px;
  margin-bottom: 10px;
  border-top: solid 1px #ababab;
  border-bottom: solid 1px #ababab;
}
.new-author-date {
  margin-top: 10px;
  margin-bottom: 10px;
  display: flex;
  flex-direction: row;
  align-items: center;
}
.new-author {
  margin-left: 20rpx;
  margin-right: 20rpx;
  width: 50rpx;
  height: 50rpx;
}
.new-date {
  margin-left: 10rpx;
  color: #ababab;
  font-size: 25rpx;
}
.new-info {
  margin-top: 5px;
  margin-bottom: 10px;
}
.new-info-tile {
  margin-left: 10rpx;
  font-weight: 600;
}
.new-info-img {
  width: 100%;
  margin-top: 10px;
}
.new-info-summary {
  margin-left: 40rpx;
  margin-right: 40rpx;
  line-height: 44rpx;
  font-size: 28rpx;
  color: #666;
  letter-spacing: 3rpx;
}
.new-img-num {
  margin-bottom: 10px;
}
.new-img {
  width: 30rpx;
  height: 30rpx;
  margin-left: 30rpx;
}
.new-num {
  margin-left: 10rpx;
  font-size: 28rpx;
  color: #666;
}
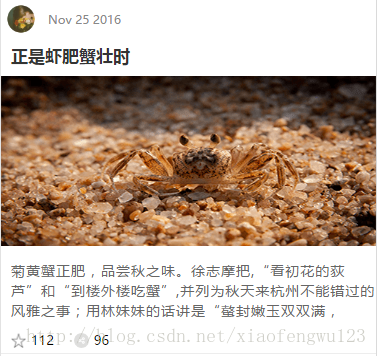
然后修改post.wxml:
<view class="wrap">
<view class="new-author-date">
<image src="../../images/avatar/1.png" class="new-author">image>
<text class="new-date">Nov 25 2016text>
view>
<view class="new-info">
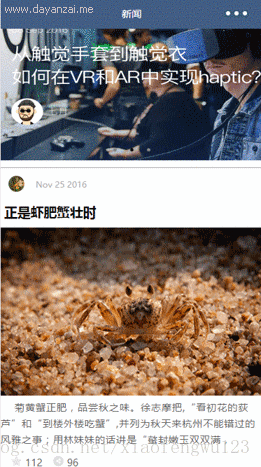
<text class="new-info-tile">正是虾肥蟹壮时text>
<image src="../../images/post/crab.png" class="new-info-img">image>
<text class="new-info-summary">菊黄蟹正肥,品尝秋之味。徐志摩把,“看初花的荻芦”和“到楼外楼吃蟹”,并列为秋天来杭州不能错过的风雅之事;用林妹妹的话讲是“螯封嫩玉双双满,text>
view>
<view class="new-img-num">
<image src="../../images/icon/none-star.png" class="new-img">image>
<text class="new-num">112text>
<image src="../../images/icon/share-anti.png" class="new-img">image>
<text class="new-num">96text>
view>
view>效果图如下:
同步码
打开git for windows工具,执行以下命令同步代码:
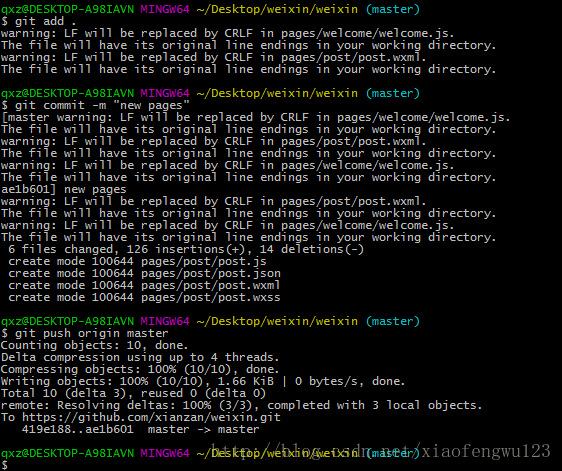
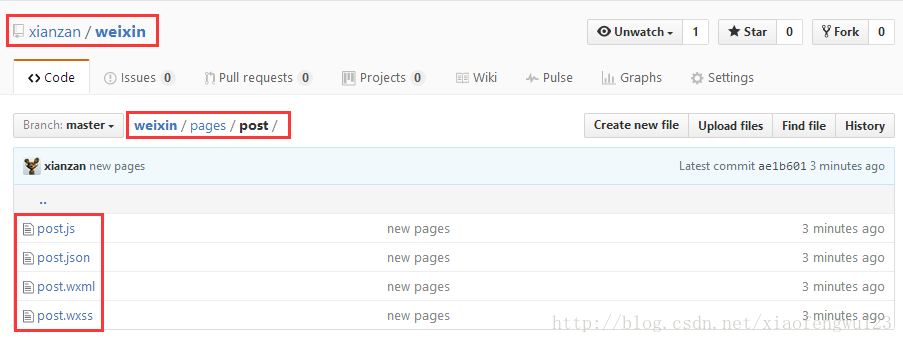
最后在 GitHub 上查看一下最后的代码是否同步成功。
总结
编写轮播图并不难。官方提供的api+web前端的知识基本可以解决,新闻列表也不难。将新闻列表中的元素进行分组,然后编写每个元素的样式。总的来说,微信页面的编写与前端网页的编写没有太大区别:所见即所得。


")
")